
Follw a ste-by-step guide on how to set up and run a quiz in Canvas for MCQ or CEX online assessment.
Setting up a Canvas quiz
Find out about:
- creating a Canvas quiz
- marking and marks release
- steps to take before the quiz
- steps to take after the quiz
- setting up Reasonable Adjustments (RAs)
- releasing a question paper for a CEX assessment
- disabling inline preview
- using images in quizzes.
Creating a Canvas quiz
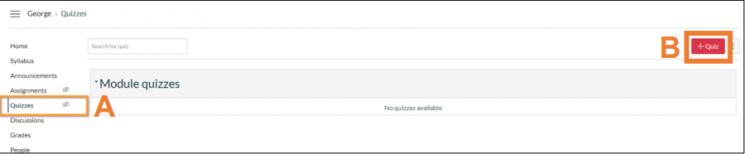
1. Go to your module within Canvas. In the module menu, select the ‘quizzes’ option (marked A on image).
2. Select +Quiz (marked B on image).
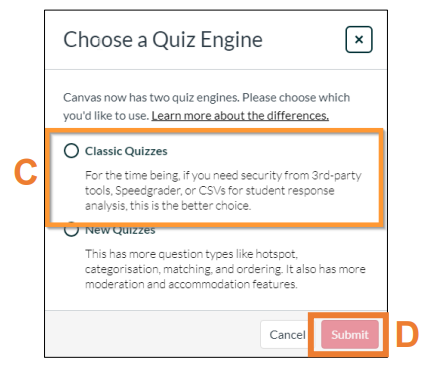
3. You will then be presented with a menu asking you to choose between ‘classic quizzes’ and ‘new quizzes’. Choose ‘classic quizzes’ (marked C on image) and then click the ‘submit’ button (marked D on image).
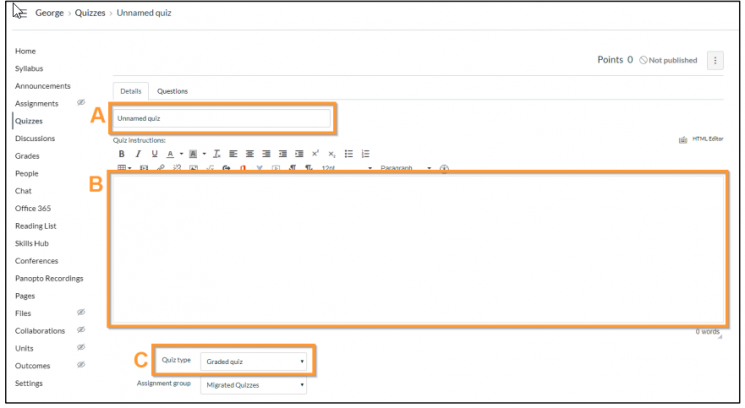
4. You’ll then be brought into the quiz settings. Add a quiz title (marked A on the image). This title will be displayed to students and should indicate that this is the MCQ or CEX assessment.
5. Next complete ‘options’. There are certain options that need to be set up to ensure the MCQ works correctly:
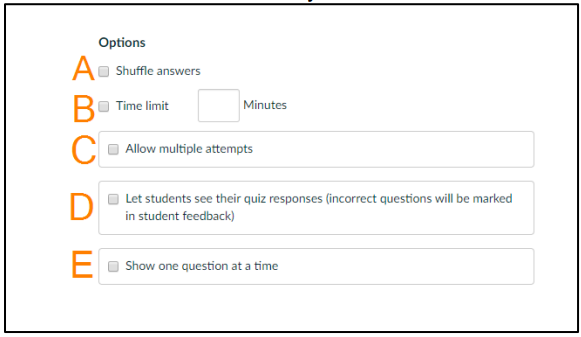
- Shuffle answers (marked A on the image). If this box is selected, Canvas will shuffle the order of questions that appear to students, decreasing the risk of collusion between students. This is recommended for MCQ assessments. If this option is enabled then you must ensure none of your quiz question rely on the potential answers displaying in a set order.
- Time limit. (marked B on the image). If this box is selected, you will be able to specify a number of minutes that students will be allowed to complete the quiz. This enables a shorter sitting time within the overall availability window of the assessment. For a CEX assessment using a File Upload question, make sure the time limit includes additional time for students to download any question papers and upload their answer document. If you have students who have additional time allocated as a Reasonable Adjustment (RA), you will add this later. Follow the advice in the Setting up Reasonable Adjustments (RAs) section of this document.
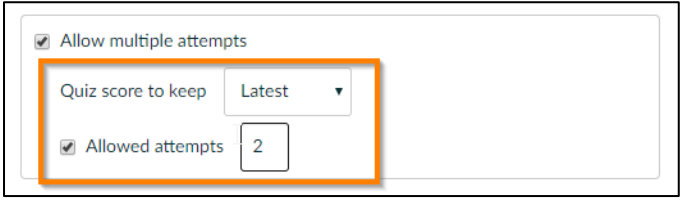
- Allow multiple attempts (marked C on the image). For CEX assessments ensure this option is selected. For MCQ assessments it should not be selected. This will allow students to make an additional attempt at the CEX assessment if they lose internet connection orc experience other technical issues during their initial attempt. After you have selected this option some new sub-options will appear below. These are 'quiz score to keep' – change this drop down-box to ensure the option 'latest' is selected. This will ensure the last quiz attempt is the score recorded by Canvas. By default, the 'highest' score is kept. The other is 'allowed attempts' – it is recommended that you tick this option and change the allowed number of attempts to '2'. This will give students two attempts at the assessment, providing a safety net against technical issues during the initial attempt.
- Let students see their quiz responses (marked D on the image). For CEX – check this box to allow students to verify their file uploads. Important: Grade posting policy should be set to Automatic. For more information see Marking and Marks release below. For MCQ – ensure this option is not selected, to prevent students from seeing the correct/incorrect answers as soon as they have finished their attempt.
- Show one question at a time. You are recommended to select this option, which will present questions one at a time in the quiz. Otherwise all questions will appear on the screen in a list.
6. You can also restrict quiz access through two options (if you want to).
These are:
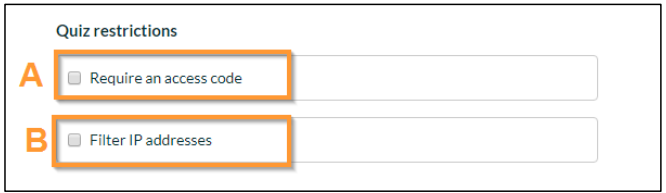
- Require an access code (marked A on the image). This option will allow you create an access code which works like a password that students will need to enter before they can access the quiz. If you select this option, you will need to clearly communicate the access code to students.
- Filter IP addresses (marked B on the image). When this is ticked you can input an IP address and only students connecting from computers with that IP address will be able to access the quiz. This is only suitable where all the computers being used are connected to the University’s Eduroam network; it must not be selected for remote assessment.
7. Next fill in the 'assign' settings:
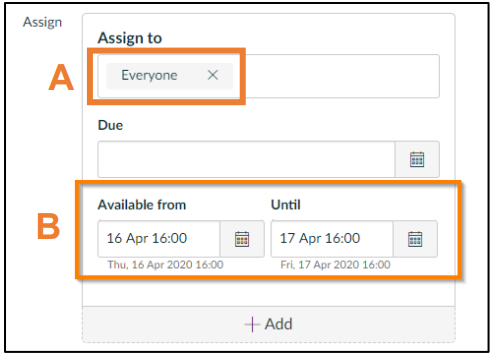
- Make sure 'assign to' shows 'everyone' (marked A on the image). In rare circumstances, where one or more students on the module are not intended to take this assessment, you will need to make sure this is communicated clearly to them.
- Add an 'available from' date. Students will be able to access the quiz once this date and time have passed. Add an 'until date'. This will be the date and time that the quiz becomes locked and is no longer available to students. For MCQ and CEX assessments these two dates/times will normally provide a 24-hour window where students can attempt the assessment (although the 'time limit' setting will restrict how long they can spend on any one attempt – see step 5(b)). You do not need to set a due date.
Creating questions
Once you have entered the quiz details, you will need to populate the quiz with questions.
1. Scroll to the top of the page and click 'questions.'
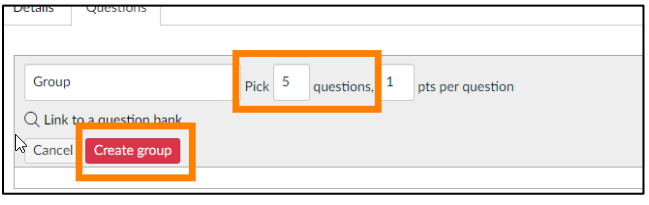
2. In order for your quiz questions to be randomised, you’ll need to create a question group containing all your quiz questions. Select '+ New question group'.
Important: the points available for each question in a question group must be the same. If your assessment has questions worth different numbers of points, these questions must be added separately and cannot be randomised. In this case, click '+ New question' instead and go to step 5 below.

3. Enter a name for the question group, how many questions your quiz will have, the number of points available for each question and then click 'create group'.
4. You’ll now have an empty question group, to fill it with questions click the + icon within the group box to add questions to the quiz.

5. You’ll then be taken to the question creation screen.
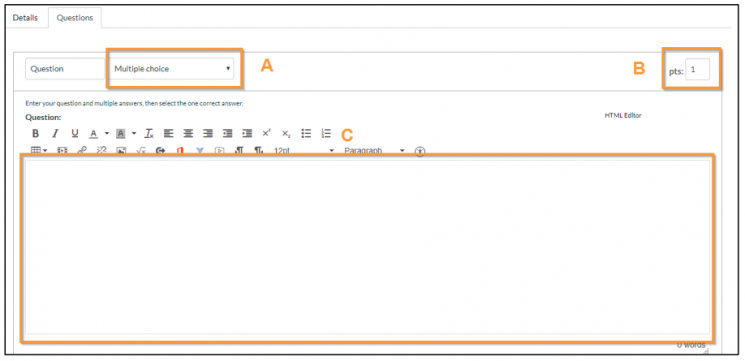
(A) Select your question type from the dropdown box, the options are:
- Multiple Choice
- True/False
- Fill-in-the-Blank
- Fill-in-Multiple-Blanks
- Multiple Answers
- Multiple Drop-down
- Matching
- Numerical Answer
- Formula (simple formula and single variable
- Essay
- File Upload
For more information about these questions types see this guide.
(B) Adjust the points value of the question here.
(C) Add the question text into the large text box.
6. Once you have selected your question type and written in your question, you will have to set the possible answers and the correct answers. Please note the layout for answers may vary based on the question type chosen; the example shown is for a multiple-choice question. For CEX assessments using a File Upload question, you will also need to set up the release of the question paper to students. See Releasing a question paper for a CEX assessment.
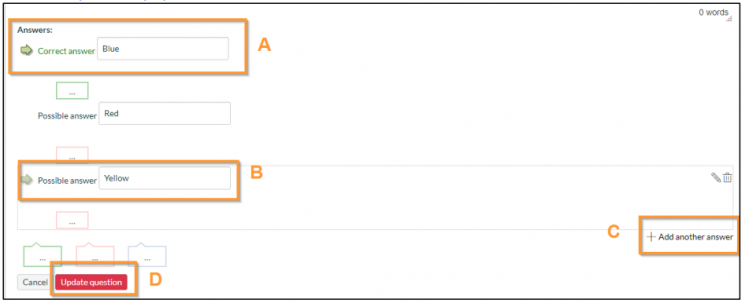
(A) Correct answer arrow. When you hover your mouse over any of the answer boxes you will be presented with a translucent green arrow, left clicking this arrow will set that answer as the correct answer.
(B) Possible Answer. Enter a potential answer into this box.
C) Add another answer. This will generate a new possible answer box.
(D) Update question. Click this when you are done with editing your question and answer to save the question.
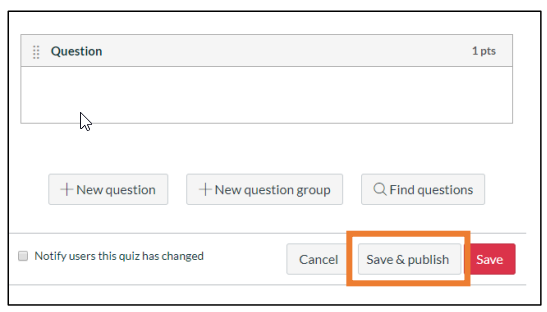
7. Repeat these steps for each additional question.
8. Finally click Save and publish at the bottom of the page to make your quiz available to your students.
Marking and marks release
Guidance on marking and releasing of marks.
Changing the grade posting policy
By default, grades will be shown to students immediately after a quiz closes, leave as Automatic for CEX file upload exams, this allows students to check they have submitted the correct file. It won’t let students resubmit on the same attempt, but they can use their additional attempt if needed. When all students have submitted, change to manual and hide marks as outlined below to prevent marks being released early.
For MCQ assessments, you must change the grade posting policy to manual, to ensure grades aren't shown to students until you are ready to release them.
Select Grades from the module menu.
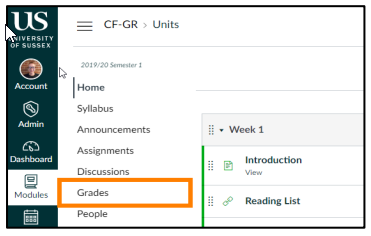
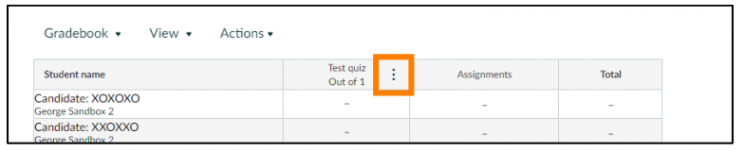
Within the grades screen you’ll see columns for each of the module’s assignments and quizzes. Locate the relevant quiz and click the vertical ellipsis button next to the quiz name.
This will display set of options; from these, click Grades posting policy.
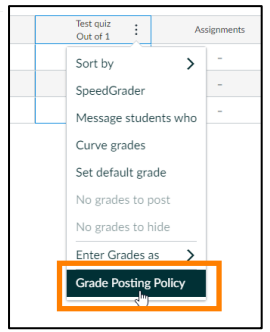
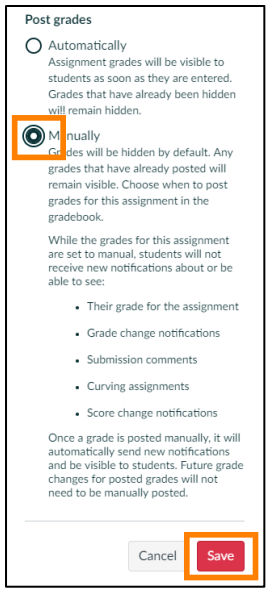
This will open the Grade posting policy menu on the right-hand side of the screen. Select the option Manually and then click the save button.
You will then need to again select the vertical ellipses button next to the quiz name and this time within the submenu select 'Hide grades'.

This will open a menu on the right-hand side of the screen, select the Hide button.
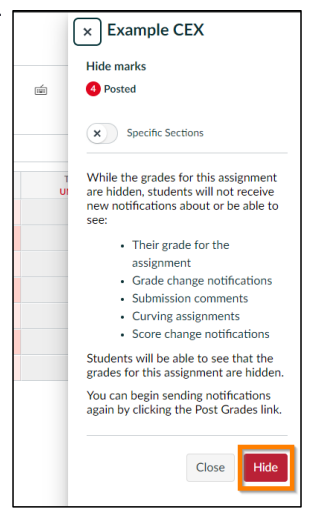
You should then receive a notification at the top of the screen confirming that grades have been hidden.

Marking a quiz
You will only need to mark a quiz manually if you have included Essay and/or File Upload question types; all other question types will be automatically marked. You may also wish to mark manually if you wish to adjust scores for a quiz attempt.
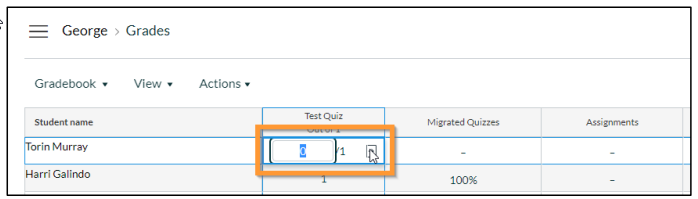
1. Go to your Canvas module and click Grades in the module menu.
2. Within Grades you will see a column for each assignment and quiz. Locate the quiz you wish to mark and click on a student’s score. An arrow will appear, click this icon.
3. A sidebar will appear on the right-hand side of the screen. Locate and click the Mark Assignment link within the sidebar.
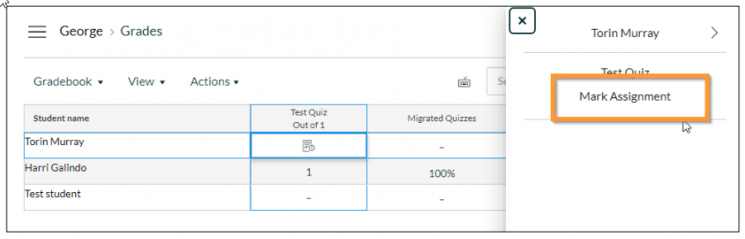
You’ll then be taken into SpeedGrader, where the quiz can viewed and marked if needed.
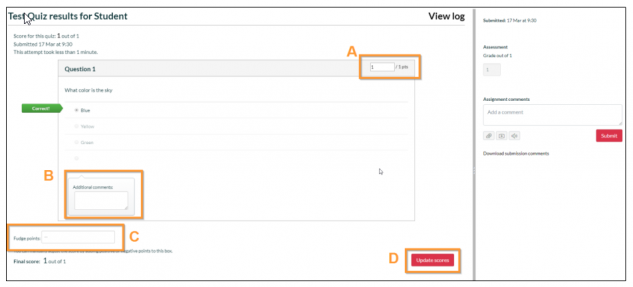
(A) Question score – Most question types will be automatically marked by Canvas. Others such as essay question types will not be automatically marked. In either case you can manually adjust the marks for a question by overtyping in this box.
(B) Additional comments – You can leave comments for the student on each question here.
(C) Fudge points – This allows you to alter the overall marks given to a student for a quiz by typing in either a positive or negative number here.
(D) Update scores – Click this button to update scores if you have made any changes.
Steps to take before the quiz
Before students take the quiz, there are a few things to check.
1. Is the Quiz menu item visible to students in the course navigation?
You can check if the Quiz area is accessible by looking at the course navigation menu, if there is an eye icon with a line through it next to Quizzes then you’ll need to
make it visible to students, see this Canvas guidance on managing course navigation links.
2. How are you going to let students know about the quiz?
Ensure all students know the dates and times of the quiz by communicating this through Announcements or a similar communication method.
3. Are students aware of time limits and multiple attempts?
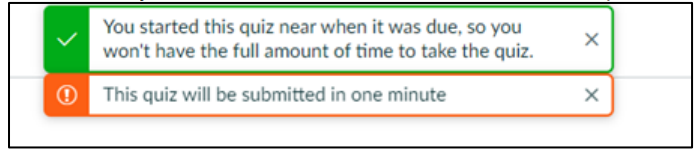
Make sure students are aware of how a quiz will operate, for example that a quiz will end exactly on the date and time specified in the Until date, this means they’ll need to start the quiz with enough time to complete it before the Until date is reached, otherwise they won’t have the full amount of time to take the quiz.
Steps to take after the quiz
Please note: there is currently no mechanism for exporting quiz grades directly into Sussex Direct. The grades for MCQ and CEX assessments will need to be entered manually into Sussex Direct.
Setting up Reasonable Adjustments (RAs)
You made need to allocate additional time in quizzes for students with Reasonable Adjustments (RAs).
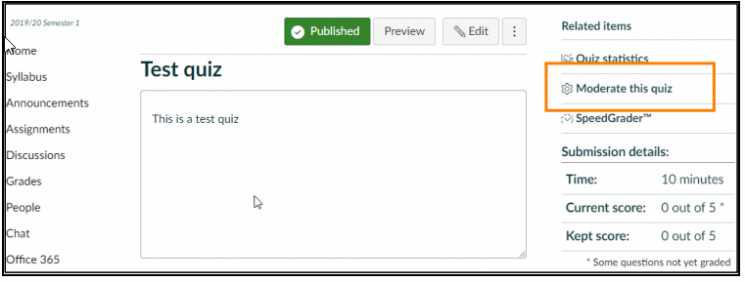
To do this you’ll need to moderate the quiz. Go into the quiz and click Moderate this quiz.
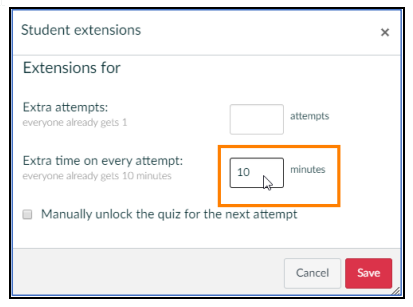
You’ll be taken to the Moderate quiz screen containing a list of students. Click the tick-box next to each respective student you wish to apply additional time to, then select Change extension for selected students.

This will open the Student extensions screen. Enter the amount of additional time you wish to give the selected student/s into the box next to Extra time on every attemptand then click Save.
Releasing a question paper for a CEX assessment
A CEX assessment may require students to download a question paper and then submit their answers as a file upload.To make the paper available to students only once they’ve started their assessment attempt, it is important to carry out the following steps.
1. Go to the Files area and click +Folder to create a new folder within Files.
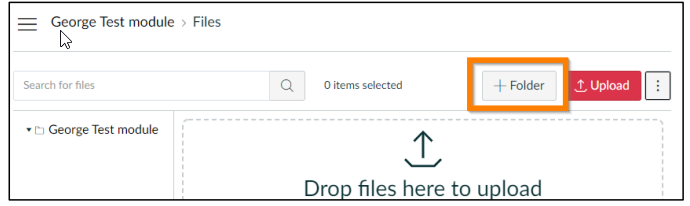
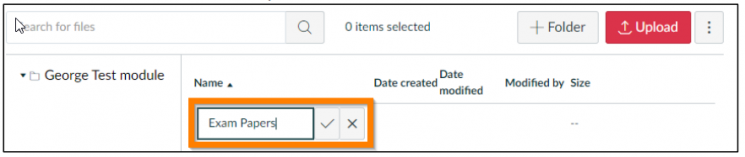
2. Name the folder ‘Exam Papers’ or similar and then click the ✓icon.
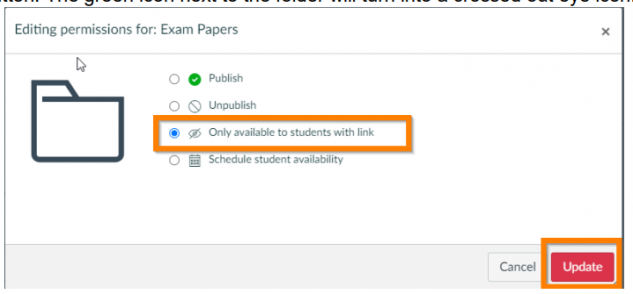
3. Click on the green tick icon next to the folder name to edit the folder permissions.

4. Select the option Only available to students with link and then click the Update button.The green icon next to the folder will turn into a crossed out eye icon.
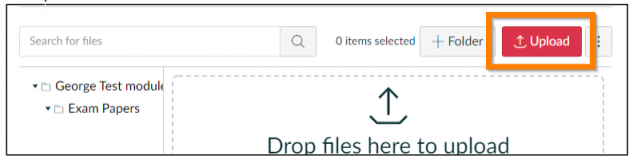
5. Open the ‘Exam Papers’ folder by clicking on the folder’s name.
6. Ensure you are within the folder then click Uploadand choose the appropriate paper to upload.
7. Now go to your quiz and create a File upload question.
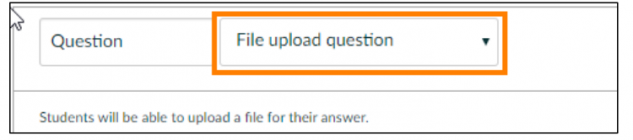
8. Within the Question text for the question write an explanation informing students that they will need to download the question paper and upload their answers.
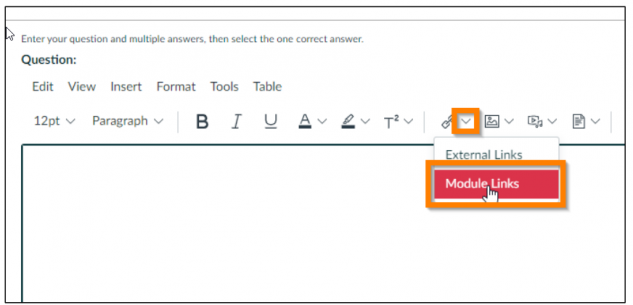
9. Then, insert the question paper into the Question text by clicking the chevron arrow next to the link icon on the toolbar, this will display a submenu where you can select the option, Module Links.
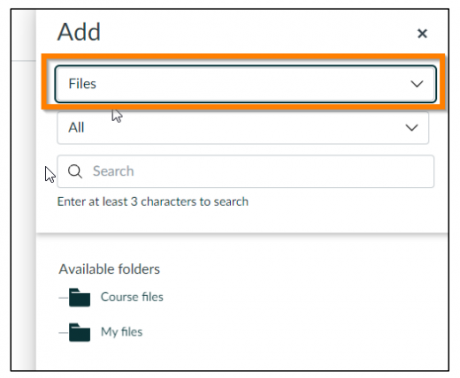
10. The Add sidebar will then appear on the right hand side of the screen, ensure the top dropdown box is set to Files.
You’ll then be shown a directory of files, select Course filesto see all files and file folders associated with the current module, navigate to wherever the exam paper is saved and select the exam paper file.
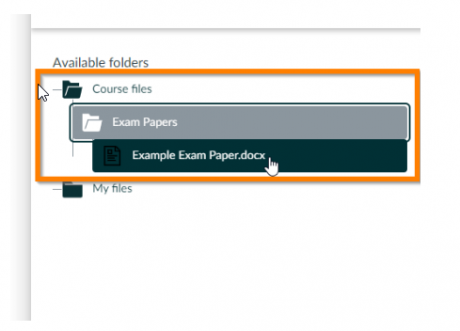
A link to the paper will now have been created within the quiz instructions. Students will only be able to access it once they have started their quiz attempt.
Images in quizzes
If you are uploading images to use within a quiz students can view the names of image files, therefore do not include any information within the image’s file name that could help the student answer the question. It’s advisable to give image files generic names such as quizimage1, quizimage 2 etc.